Have you always wanted to learn brioche knitting? Here's your chance. This pattern includes a detailed photo tutorial, so if you have just begun to knit and know the basics, you can easily make this scarf.
I absolutely love the texture of brioche knitting. It is so thick and squishy! Using super bulky yarn, this must be one of the quickest scarves I have ever made. I called it the Oatmeal and Raisin Scarf because those are the yarn colors I used, but obviously it would look great in any color combination!
Read on to learn the basics of brioche knitting. As always, this pattern is available as an ad-free pdf in my Etsy shop. You can also find it on Ravelry.
The pattern for the beanie that is pictured is also available here: Oatmeal and Raisin Beanie. Because of the detailed photo tutorials I created separate blog posts so you can more easily find the one you are looking for.
To make this scarf you will need two skeins of Lion Brand Wool Ease Thick & Quick (one in each color) and a 24" circular knitting needle in size 11 (8.00 mm). You will also need a tapestry needle for weaving in ends. The links below are the products I used to knit this scarf.
As an Amazon Associate, I may earn on qualifying purchases
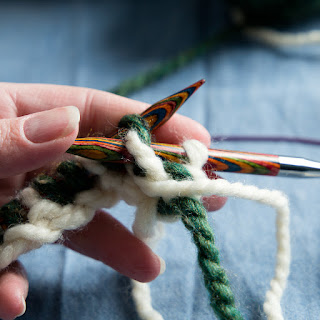
Circular knitting needles are required for brioche knitting, even when worked flat. Each row is worked twice on the same side, once in the contrasting color and once in the main color. Circular needles allow you to slide your work back to the beginning to easily work the second color. The other option would be to transfer all of the stitches from one needle to another after each color - not a very feasible option.
Photo Tutorial - Brioche Knit Flat (scarf)
Half hitch cast on
1. Wrap yarn around LH needle with tail in front of working yarn
2. Make a loop with working yarn closest to loop already on needle (as pictured)
3. Pull tight
Continue adding stitches in this fashion until you have 13 stitches on your needle.
Row 1 (RS - MC) 1x1 Rib
1. Begin k1 p1 across by knitting the first stitch. Purl the second stitch. Pull each stitch a little, but not tight. Make sure you have uniform loops across the bottom.
2. By the end of the row, the extra yarn in the middle will be a bit longer. You will pull it through on the last stitch, which will make the tail a bit longer.

Row 2 (WS - CC) Wrong side, contrasting color (setup row)
1. Attach contrasting color of yarn (Color B)
2. With yarn in front, slip first stitch purlwise
3. Insert needle into next stitch to knit.
4. Bring yarn over RH needle to complete the stitch.
5. You will have one knit stitch and one slipped stitch with a yarn over on your needle.
6. Bring yarn to front and repeat by slipping the next stitch purlwise
7. Continue across the row, k1, bringing yarn over RH needle to complete the stitch, bring yarn to front, slip next stitch pw.
8. When you reach the end of the row, the last stitch will be a slipped stitch. Remember that the yarn over will be included with that stitch at the end of the next stage.

Row 2 (WS - MC) Wrong side, main color
1. Slide work from one end to the other of your circular needle. You will now work the same row in the same direction using the main color (Color A)
2. Purl the first stitch including the yarn over. This is called a brioche purl (brp).
3. Insert needle into next stitch as if to purl, and wrap yarn around the needle as if to purl.
4. Slip the stitch off the needle without completing the purl stitch. This is slip 1 purlwise, yarn over (sl 1 pw, yo).
5. Purl the next stitch with the yarn over.
6. Continue in this pattern to the end of the row.
7. On the last stitch, make sure the yarn over in your contrasting color is over the needle when you work the purl stitch.
8. When you are done, you will have a series of single and double stitches on your needles.

Row 3 (RS - CC) Right side, contrasting color
1. Turn your work to begin working on the right side of the scarf.
2. With contrasting color in front of your RH needle, insert needle into next stitch purlwise
3. Wrap yarn around needle as if to purl, but do not complete the stitch
4. Slip stitch and yarn over to RH needle
5. Purl the next stitch including the yarn over.
6. You will have one slipped stitch with a yarn over and one purl stitch on your needle.
7. Continue across in this pattern.
8. On the last stitch, yo and slip stitch pw
9. Remember to include this yarn over at the end of this row worked in main color (MC)
Row 3 (RS - MC) Right side, main color
1. Slide work back to other end of needles
2. Knit the first stitch with its yarn over. This is called brioche knit (brk).
3. Bring yarn to front and slip next stitch purlwise
4. Knit next stitch, bring yarn over RH needle to complete the stitch. Continue across the row in this pattern.
5. Remember to include the yarn over on the last stitch.
6. The ribbed brioche pattern is now starting to show.
Repeat Row 2 (WS - CC) - this row is worked the same except the knit stitches will now be knit with the yarn over making them brk (brioche knit) stitches.
You will repeat these two rows (in four parts) until the scarf measures desired length.
Oatmeal & Raisin Beginner Brioche Scarf and Beanie
Knitting Pattern
Difficulty
⚫ ⚫ ⚪ ⚪ ⚪
Finished Size
The finished size listed is for a scarf that uses up approximately 2 skeins of Wool-Ease Thick and Quick. Both the length and width of the scarf can easily be adjusted.
All measurements are approximate as this fabric has a significant amount of stretch.
Scarf Length: 70”/178 cm
Scarf Width: 6.5”/17 cm
Instructions are written using standard US abbreviations.
CO - cast on
K - knit
P - purl
Brk - brioche knit
Brp - brioche purl
Yo - yarn over
Wyif - with yarn in front
BO - bind off
RS - right side of work
WS - wrong side of work
MC - main color
CC - contrasting color
Materials
- Lion Brand Wool-Ease Thick & Quick™ solids (6 oz./170 g; 106 yds/97 m):
- 1 skein #123 Oatmeal (Main Color)
- 1 skein #144 Raisin (Contrasting Color)
- Size 11 (8.00 mm), 24” circular knitting needles
- Tapestry needle (for weaving in ends)
Gauge (Approximately)
With Wool Ease Thick & Quick™ and size 11 (8.00 mm) needles:
16 stitches in 1x1 rib = 4” (10 cm) - completely unstretched
12 rows in 1x1 rib = 4” (10 cm)
Size Adjustments
To make the scarf wider, cast on additional stitches in multiples of two.
To make the scarf longer just attach another skein of yarn when you run out and keep knitting to the desired length.
Scarf Instructions
With MC, cast on 13 stitches using a stretchy cast on. I used a simple half-hitch, although a knitted cast on or Italian cast on would both work well. If you use a knitted or Italian cast on, you can skip Row 1 and begin with Row 2.
Row 1: [k1 p1] 6 times; k last stitch. Turn.
Attach CC.
Row 2 (WS - CC): Wyif, sl 1st st pw. *Knit next stitch, bringing yarn over the needle to complete the stitch. Wyif, sl next st pw. Repeat from * across. Do NOT turn. Slide work back to beginning of needle to work the same row in MC.
Row 2 (WS - MC): Wyif, p 1st stitch including its yo. *Insert needle into next stitch as if to purl, wrap yarn around needle, but do NOT complete the stitch. Slip stitch and yo to right-hand needle. Purl next stitch with its yo (one brp made). Repeat from * across. Turn.
Row 3 (RS - CC): Wyif, insert needle into next stitch as if to purl, wrap yarn around needle, but do NOT complete the stitch. Slip stitch and yo to right-hand needle. (this is usually written as slip next st pw, yo) Purl next stitch with its yo (one brp made). Repeat from * across. Do NOT turn. Slide work back to beginning of needle to work the same row in MC.
Row 3 (RS - MC): K 1st st with its yo (one brk made). *Bring yarn to front; sl next st pw; brk next st, bringing yarn over rh needle to complete the stitch. Repeat from * across. Turn.
Row 4 (WS - CC): Wyif, sl 1st st pw. *Brk next stitch, bringing yarn over the needle to complete the stitch. Wyif, sl next st pw. Repeat from * across. Do NOT turn. Slide work back to beginning of needle to work the same row in MC.
Row 4 (WS - MC): Wyif, p 1st stitch including its yo (brp). *Insert needle into next stitch as if to purl, wrap yarn around needle, but do NOT complete the stitch; slip stitch and yo to right-hand needle. Brp next stitch). Repeat from * across. Turn.
Repeat Rows 3-4 until scarf measures approximately 69” or until you have at least 2-3 yards remaining of both colors, ending with a WS row (Row 4).
Final Row (RS - CC): Repeat Row 3 (RS - CC).
Final Row (RS - MC): Bind off each stitch in a k1 p1 fashion. K first stitch with its yarn over. P next stitch. Bring the first stitch made on rh needle over 2nd stitch made. Continue in k1 p1, binding off each stitch.
As an Amazon Associate, I earn on qualifying purchases.
Copyright © 2022 Sharon Hansen/Yarnmare
www.yarnmare.blogspot.com | facebook.com/yarnmare | Instagram @yarnmare
The pattern and photographs of this design are the property of Sharon Hansen/Yarnmare. This pattern and design are subject to copyright, and are for personal, non-commercial use only. You may not distribute or sell this pattern or any items created using the directions in this pattern without consent. Please email yarnmare@gmail.com with any questions.


Comments
Post a Comment