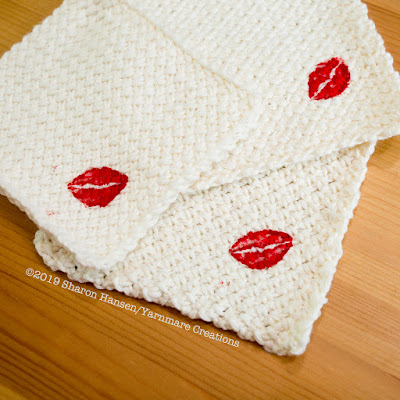
Rubber Stamped Drink Napkins
 It has been a busy week or two, getting ready for school to start. I'm a teacher, so I have lots of lessons and classroom routines to plan. But I did manage to get this post ready to go!
I got the idea for lips when I first created these napkins. I thought, "What are drink napkins used for besides setting drinks on?" They are used to blot lipstick and write phone numbers on. It took a little research and testing to get it just right, but I believe I have created a pretty unique idea here - and completely customizable to suit your own creative side. These would make great housewarming, wedding, or even Christmas gifts! I only purchased one stamp to start - a pair of lips, but I have included links below to other ideas you may want to try.
I also thought it would also be fun to write a name and phone number on the napkins, but I didn't have a fabric pen with a large enough tip to try that here. I would love to see your results if you try it!
I started by choosing a good fabric paint. I wanted something that would hold up when washing and work on the thick texture of a crocheted item. I ended up purchasing the Speedball paint in red (link below). It cleans up easily with water, but is machine washable. Based on my initial research, I tried to just spread the paint using a spoon and dip the stamp in a thin layer, but it was filling in the detail on my stamp. I realized that I needed a brayer - which is like a rubber paint roller. You roll the brayer in the paint, and then roll it onto the stamp to get a thin, even layer. I purchased the brayer (roller) below to spread the paint evenly on the stamp for better detail. The stamp I used is also listed below, but any rubber stamp would work. Go crazy and let out your creative side!
Rubber Stamping
To put some cool stamps on your drink napkins, you first need to make the napkins. You can find patterns for the knit version here, and the crochet version here. I used the lightest color napkins I had made, in Lion Brand Comfy Cotton Blend, color Whipped Cream. You could substitute another brand of yarn if you would prefer a crisp white napkin for stamping.
You also need the items pictured below:
Rubber Stamp
Brayer (rubber roller)
Paper plate
Plastic spoon
You might want to cover your surface with newspaper to prevent spills.
To purchase the same items I used, click on the links above.
Follow the steps below to stamp your own napkins!
Step 1:
Place a small amount of paint on the paper plate and spread it into a thin layer using the back of the spoon.
Step 2:
Roll the brayer through the paint to get an even layer on the roller.
Step 3:
Roll the brayer over the surface of the stamp to apply a thin layer of paint to it. Be careful not to slide the roller because the paint will get into the details of the stamp. Watch out for the corners of the stamp block also. You can see I got a little bit on the lower right corner of my block, which I accidentally transferred to one of my napkins when I stamped it.
Step 4: Press stamp onto napkin, being careful not to smear the paint.
Allow paint to dry, undisturbed, for at least 24 hours. The paint must cure for 7 days (according to the package) before it is safe to wash.
Here are some other ideas to get your creative juices flowing! Keep in mind when choosing stamps, finer details will not print well with the rough texture of the napkins. It is best to use stamps that do not have a lot of very fine detail. The stamps I selected below should work, but I cannot guarantee it as I have not tried them.
Be sure to share your projects on Instagram @yarnmare. I would love to see your creations!
Halloween Stamps:
Christmas Stamps:
As an Amazon Associate I earn from qualifying purchases.
Copyright © 2019 Sharon Hansen/Yarnmare
www.yarnmare.blogspot.com | facebook.com/yarnmare | Instagram @yarnmare
The pattern and photographs of this design are the property of Sharon Hansen/Yarnmare. This pattern and design are subject to copyright, and are for personal, non-commercial use only. You may not distribute or sell this pattern or any items created using the directions in this pattern without consent. Please email yarnmare@gmail.com with any questions.


Comments
Post a Comment