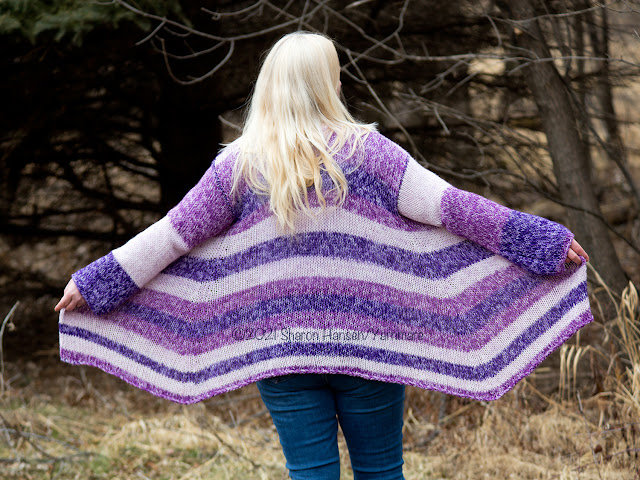
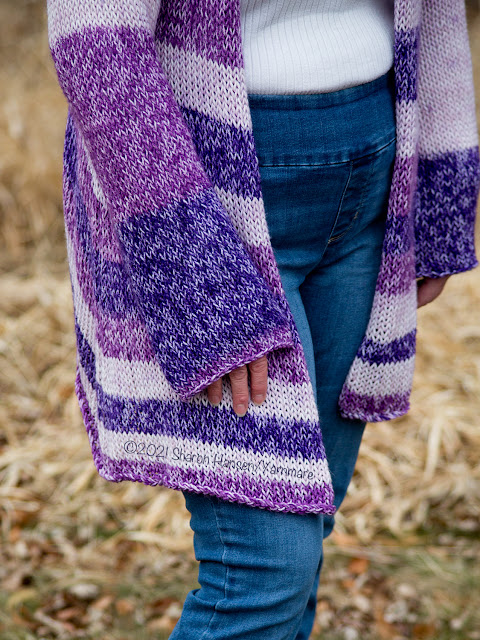
The Mandala Cardi is a light and airy cardigan, with a lot of drape and a wide, flared bottom. It is a great transition piece as the summer nights begin to cool. This cardi is nearly seamless; the only seams are the shoulder seams. It is knit from the bottom up, decreasing to allow for the flare. The upper back and front sections are knit separately and then joined at the shoulders. The sleeves are picked up at the armholes and worked in the round with no decreases. The sleeves are slim for a more fitted look, but can easily be adjusted to fit any size arm. The length can also be adjusted easily.
This is a quick cardi to knit, or at least it seems to be. Working the entire body in one piece, and starting large and decreasing, helps keep the motivation going. I also made it nearly seamless, so once you're done weaving in a few ends, you can wear it right away. No putting it aside until you're motivated to stitch it together!
Finished Sizes
This pattern is written for the following sizes (bust measurement):
XS (28-30), S (32-34), M (36-38), L (40-42), XL (44-46), 2XL (48-50), and 3XL (52-54), 4XL (56-58), and 5XL (60-62). It is designed to be worn slightly loose, with a positive ease of 2”-4”. Sizes are listed as XS (S, M, L, XL, 2XL, 3XL, 4XL, 5XL)
All measurements are approximate as this fabric has a significant amount of stretch.
Length: 30 (30, 30, 30, 30, 30, 30, 30, 30)”/76 (76, 76, 76, 76, 76, 76, 76, 76) cm
Back width: 18 (20, 22, 24, 26, 28, 30. 32, 34)”/46 (51, 56, 61, 66, 71, 76, 81, 86) cm
Bottom Circumference: 54 (60, 66, 72, 78, 84, 90, 96, 102)”/137 (152, 168, 183, 198, 213, 229, 244, 259) cm
Size Adjustment
This cardi can be made longer or shorter by knitting more or fewer rows before dividing for the armholes. Arm circumference can be adjusted by making the armholes a little longer, and then picking up more stitches for sleeves. Use instructions for a larger size when knitting the armholes.
Instructions are written using standard US abbreviations.
CO - cast on
K - knit
P - purl
K2tog - knit 2 together
PM - place marker
Materials
- Lion Brand Mandala yarn (5.3 oz/150 g; 344 yds/315 m) in #219 Chi: 2 (2, 3, 3, 3, 3, 4, 4, 4) skeins.
- Size 11 ( mm), 60” circular knitting needles (larger sizes may require longer circular needles to accommodate the width at the start of the cardi, but 60” should be large enough for most sizes as the gauge is very loose)
- Size 11 ( mm) 24” circular needles (or smaller) for sleeves
- Tapestry needle (for seams and weaving in ends)
As an Amazon Affiliate, I earn on qualifying purchases.
Gauge
Approximately:
11 stitches in main pattern stitch = 4”
16 rows in main pattern stitch = 4”
Notes
The body of the cardigan is knitted in one piece from the bottom up. Piece is worked separately from the armholes. The only seaming required is the shoulder seams. The sleeves are picked up at the armholes, and knit straight, with no decreases. Pattern includes an edge stitch that will always be a purl for the first and last stitch of every row.
Body
With size 11 ( mm) 60” circular needles, cast on 140 (152, 168, 184, 200, 216, 228, 244, 256) stitches.
Row 1 (RS): P1, k 34 (37, 41, 45, 49, 53, 56, 60, 63); place marker (PM). P1, k 68 (74, 82, 90, 98, 106, 112, 120, 126), PM. P1, k 34 (37, 41, 45, 49, 53, 56, 60, 63), p last stitch. Turn.
Row 2 (WS): P to 1 st before first marker, k1, sl marker. P to 1 st before 2nd marker, k1, sl marker. P to end of row. Turn.
Row 3 (RS): P1, k to first marker, sl marker, p1, k to next marker, sl marker, p1, k to last stitch, p last stitch. Turn.
Row 4 (WS): Repeat Row 2.
Rows 5-6: Repeat Rows 3-4 once more.
Row 7 (decrease row): P 1, k to 3 stitches before 1st marker, k2tog, k1, sl marker, p1, k1, ssk, k to 3 st before next marker, k2tog, k1, sl marker, p1, k1, ssk. K to last stitch, p last stitch. Turn. [136 (148, 164, 180, 196, 212, 224, 240, 252) stitches]
Row 8: Repeat Row 4.
[Repeat Rows 5-8] 11 (12, 13, 14, 15, 16, 17, 18, 19) more times. [92 (100, 112, 124, 136, 148, 156, 168, 176) stitches]
Continue in pattern (no decreases) until piece measures 22” (56 cm), ending with a WS row.
Divide for Armholes/Begin Neckline Shaping
Setup Row (RS): P1, k1, ssk, k to 1st marker, sl marker, p1, k to 2nd marker, sl marker, p1, k to last 4 stitches, k2tog, k1, p last st. Turn. [94 (102, 114, 126, 138, 150, 158, 170, 178) stitches]
Setup Row (WS): P to 1 st before first marker, kfb, remove marker, sl last st made to left-hand needle to place marker between the two stitches made with the kfb, slip stitch back to right-hand needle to continue. P to 1 st before second marker, kfb, remove marker, sl last st made to left-hand needle to place marker between the two stitches made with the kfb, slip stitch back to right-hand needle to continue. P to end of row. Turn.
Right Front
Row 1 (RS): P1, k1, ssk, k to 1 st before 1st marker, p last st. Place remaining stitches on spare needle (or leave on large circular needle, but only work the stitches for the right front). Turn. 22 (24, 27, 30, 33, 36, 38, 41, 43) stitches]
Row 2: P across. Turn.
[Repeat Rows 1-2] 9 (9, 10, 10, 11, 11, 12, 13, 13) more times.
Continue knitting straight in pattern until right front measures 6.5 (7, 7.5, 8, 8.5, 9, 9.5, 10, 10.5)”/16.5 (18, 19, 20.5, 21.5, 23, 24, 25.5, 26.7) cm from beginning of armhole, or to desired armhole depth, ending with a WS row. Bind off knitwise. Fasten off and cut yarn, leaving a tail long enough to sew shoulder seam.
Left Front
Place stitches for left front on needles. Attach yarn at armhole with RS facing.
Row 1 (RS): P1, k to last 4 st, k2tog, k1, p last st. Turn. 22 (24, 27, 30, 33, 36, 38, 41, 43) stitches]
Row 2: P across. Turn.
[Repeat Rows 1-2] 9 (9, 10, 10, 11, 11, 12, 13, 13) more times.
Continue knitting straight in pattern until right front measures 6.5 (7, 7.5, 8, 8.5, 9, 9.5, 10, 10.5)”/16.5 (18, 19, 20.5, 21.5, 23, 24, 25.5, 26.7) cm from beginning of armhole, or to desired armhole depth. Count rows for Right Front to make sure the Left Front is the same length. Bind off knitwise. Fasten off and cut yarn.
Upper Back
Place stitches for upper back on needles. Attach yarn at right armhole with RS facing.
Row 1: P1, k to last st, p last st. Turn.
Row 2: P across. Turn.
Repeat Rows 1-2 until upper back measures 6.5 (7, 7.5, 8, 8.5, 9, 9.5, 10, 10.5)”/16.5 (18, 19, 20.5, 21.5, 23, 24, 25.5, 26.7) cm from beginning of armhole, or to desired armhole depth, ending with a WS row. Count rows for Right Front/Left Front to make sure the back is the same length. Bind off knitwise. Fasten off and cut yarn, leaving a tail long enough to sew shoulder seam.
Sew shoulder seams
Attach Right Front and Left Front BO edges to upper back, making sure your seams are the same length. Sew seam using long tails from Right Front and Upper Back.
SleevesAttach yarn at bottom of armhole. Pick up 36 (38, 41, 44, 47, 50, 53, 56, 59) stitches knitwise evenly around armhole. PM to mark beginning of round. The first stitch of the round will be a purl stitch that should line up with the purl stitch column up the side of the cardi.
Round 1: P1, k around. Sl marker.
Repeat Round 1 until sleeve measures 23” (58 cm) or desired length. Bind off knitwise. Fasten off and cut yarn.
Repeat for other sleeve.
Weave in ends and enjoy!


Comments
Post a Comment